Saturday, July 16, 2011

Runzas!!


So when I was a kid and we lived in Omaha, they had a "Runza Hut".  It's a chain but lots of people have never heard of it.  Anyway-  loooooong before Hot Pockets, there were Runzas.  And oh.  They are fabulous.  I haven't been to a Runza Hut in decades, but I remember they had all different kinds and fillings etc. but the Original Runza is a beef and cabbage filling.  My mom came up with her own recipe when we were kids and she made them often.  I have kind of updated her recipe here and changed it up a bit.  These are really fantastic tasting, easy to make, inexpensive, and it feeds a crowd.  Enjoy!

Ingredients:  1 lb pork sausage, cabbage (1 pound or so), Velveeta,  2 frozen bread dough loaves


1)  Place 1 lb sausage in a large skillet.  Use a handy dandy gadget such as the Mix 'n Chop from P Chef-  (I love that thing!!)  to crumble the sausage as it cooks.


2) When it's about halfway done, add some finely shredded cabbage.  You can use the angel hair cabbage from the bag- less work!  This is maybe 3-4 cups.  Add it to the meat and cook through.  The cabbage will wilt and it wont look like much so don't think it's too much.  Do not add salt & pepper- the sausage has plenty!


3)  While it's gettin' happy in the pan,  thaw out 2 loaves of frozen bread dough.  (Thank you Dear Lord for frozen bread dough ♥)   To do this, I place 2 loaves on big a plate sprayed with Pam, then cover with saran wrap (also spray the wrap!)  and defrost in microwave for 5 min, then flip oer and defrost another 5 min.  Should  do it. 


Then cut each loaf into 5 pieces


4) And now your meat mixture should be all done- drain it and cool a bit.


5) So now you want to take a piece of the dough and roll it into a circle just a little bigger than your hand.  I dont flour my counter or anything- the dough is really easy to handle.  Make your circle and add a little Velveeta.....(and Lord, Bless you for Velveeta♥)


6)  Add a couple spoonsful of the meat........


7) and roll it up. I pick up the sides (the dough stretches easily) and pinch them together for a good seal....
                                   (above)   I love how Angus is in the background just waiting....


8)  Then lay them of a greased cookie sheet and pop 'em in the oven 375* and bake until golden and sizzling.  (Some of the cheese will ooze out and some grease from theh sausage...dont worry, it's still delish)

9)  Now when I made these today I got 9.  I just rolled the other ball of dough up and made a tiny loaf of bread for Lilly.  They are HOT for a good while when you take them out, so don't be too excited or you'll burn yourself!  :)  Enjoy!

Wednesday, July 13, 2011

Zucchini Dessert


So you have 400 lbs of zucchini and are runnning out of ideas??  Well here's another fantasical, wondermous, tastetastic way to utilize it!  AND it's extra sneaky special because it tastes like Apple Crisp!   Woooooooo hooooooooooo!  I love tricking my kids into eating veggies- I think I get extra gems in my Mother of the Year crown just for that.  Oh!  Another reason this recipe is so fabulous is the crumb mixture- you make a big batch of it and it becomes the crust,  the thickener for the stewed zucchini AND the topping.  Easy Peasy!!

Step One:  In a large bowl:  4c flour, 2c sugar, 1tsp salt and 1 1/2 c (3 sticks) butter.


Step 2:  Use a pastry cutter to crumble the mixture.  If you don't have a pastry cutter (Shame on you!) you can use a fork or a couple of butter knives. 


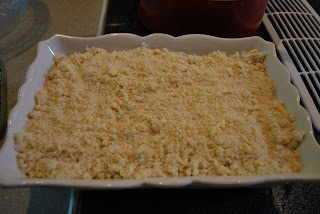
Step 3:  Should look like this.  WARNING:  This powdery crumbly deliciousness is highly addictive.  I ate the spoonful- and then some.  Set it aside- if you can.  Place 1/2c of it aside too.


Step 4:  Peel and cube enough zucchini to make 8 cups.

Step 5:  Place zucchini, 2/3c lemon juice, 1c sugar and 1 tsp cinnamon in large pot.  Cook together intil zucchini is tender- about 20-30 minutes.  Mixture will be juicy. 


Step 6:  While zucchini is moving happily along,  take 1/2 of the crumble mixture and press into 13x9 pan.  Bake at 350* for 10 minutes. 


Step 7:  Once zucchini is tender, turn off heat and blend in  1/2c crumble mixture to thicken.  It's like magic!


Step 8: Pour mixture onto crust........


Step 9:  Top with remaining crumble (you can add more cinnamon to the crumble for added yummyliciousness)


Step 10:  Bake at 350* for 35 minutes or until golden brown and bubbly.  Mmmmmmmmmmm....

Monday, August 2, 2010

Freezing Red Peppers

Look at this.  Sigh.  A picture of beauty.  They don't last long however, so you need to find a way to preserve these babies!  Here's my super duper easy peasy handy dandy tip on how to freeze your peppers:


Wash peppers.  Get out cutting board, knife and cookie sheet (or two).  Slice the peppers from top to bottom, get rid of all the seeds and the whitish parts.  Slice into pretty little strips.


Place your pretty little strips on a cookie sheet.  Try to do it in a single layer- I'm not persnickity about it, but they aren't crammed and piled in a mound either.  This helps them freeze individually so you don't have a big glob when you just need a handful for your recipe.  Take the whole cookie sheet and pop in the freezer for a good hour or so.  Mine were in there for 4 hours today because I had to leave for a bit.


When they're good and frozen solid, take the sheet out and use a scraper to loosen them from the pan.  Put them in zipper bags.  Here I have a gallon bag and a quart bag.  I guess this was about a dozen peppers.


Of course I used some right away in my zucchini stir fry.  Delish!
So that's how I do mine.  I usually use them all up by the time next year's harvest comes in, so I don't have to worry about freezer burn and whatnot.  Another great way I use my peppers (mostly the green ones) is the way my mother in law has always done hers.  I mince them real fine in my food processor and drain them (see my post with pics on Granny's sauce)   and put them in baggies.  Freeze them flat. Wonderful way to add the good green pepper flavor without it overpowering your whole dish. 
Sorry if there's typos.  It's late and I'm tired.  No time for spellcheck........

Friday, July 23, 2010

Homemade Tomato Sauce Step By Step

As promised, here are the pics. Sorry they aren't so great- I used my little Kodak point & shoot. Didn't want to get my Nikon dirty :) Also, I tend to over-explain. Hey- I like to talk!
Step 1. Blanch & peel tomatoes
Bring a pot of water to a low boil and imerse tomatoes for 30 seconds.
I happen to have a handy dandy basket.
Immediately plunge into ice water. I use my kitchen sink.

Core the tomato, then the peel should slip right off.


Squeeze the juice & seeds out (save it if you want for a juice or stock) Notice I am using the other side of my sink, throwing the peels and cores and juice right into the disposal. Then I toos the tomatoes into a big pot right next to the sink. Think assembly line.
Step. 2 Add chopped veggies and cook
Sometimes I continue on and make the sauce but sometimes I stick them in the frige and finish the next day. I mean, I am sometimes doing 100lbs of tomatoes at a time, so after peeling- I need a break! Anywho, whenever you decide to continue, chop your other veggies. I of course, use my handy dandy KitchenAid food processor. I mince my stuff pretty fine. Especially the celery. It gives it great flavor, but who wants a big ol' chunck of celery in their spaghetti or salsa?

Onions and celery

A little tip on the green pepper. When you chop it fine, it will be very juicy and foamy- especially if they are fresh from the garden. You'll need to drain them for a bit and squeeze out some juice.


Another green pepper tip. I usually work up 10-12 peppers at a time. I use some for my sauce, but the rest I like to put in ziploc baggies and freeze for other uses. Freeze it flat so it's easy to break off a chunk and toss into salad or pot of chili or whatever.
It thaws quickly since it's minced.
Okay I dont have pics of the next step- dont know why. But you have chopped your veggies and your tomatoes and have it all in the pot(s). Add sugar, salt, garlic and parsley. Cook cook cook it. I like mine to reduce by a couple of inches in the pot. The longer you cook it, the thicker the sauce. When you have it like you want it:
Step 3: Can it!
Notice my set-up: Hot clean jars, wide funnel, glass measuring cup for pouring into jars, flaps sitting in pot of hot water. Also you can see how much my sauce reduced by looking at the lines on the inside of the pot. So, you ladle the hot sauce into the hot jars, then cover with lid and screw on the bands. Place on a heavy duty cookie sheet.

Step 4: Process
If you read my recipe you'll see how I do mine. Choose whatever method you like and feel comfortable with. Here I have my 8 jars in a 250 degree oven for 20 minutes.
Easy peasy lemon squeezy!

Monday, July 19, 2010

Granny's Sauce

This time of year I am asked over and over again for my Granny's tomato sauce recipe. I have decided to put it on here, and then when one needs it, they need only stop by to look it up :) I am posting the recipe today, but I will post step by step photos in a day or two so check back.

Now, a few things.
1. This sauce is FABULOUS. If you have made it before, or been lucky enough to have dined at my home when I have served it in some fashion, please leave a comment. Let the world know that I amnot the only one out there who sings it's praises.

2. This is really an all-purpose sauce. It consists of tomatoes, onions, green peppers, celery, garlic, parsley, sugar and salt. It can be used for chili, spaghetti, soup or salsa. For the former, you simply pour it in- maybe add a can of tomato paste. For the latter, I usually open a jar of sauce, add some chopped jalapeno and cumin. Sometimes toss in a can of (rinsed) black beans and some white shoepeg corn. It's so much more versatile to make 10 quarts of this sauce than to make 10 quarts of salsa.

3. It's a lot of work, but it's not crazy hard work, and it does take time. And I often do it over a period of 2-3 days if time is an issue. I sometimes wash and peel, and core all tomatoes one day, then refrigerate them and the next day, chop veggies, cook it down and put in jars. Easy peasy lemon squeezy!

4. DISCLAIMER! This is my Granny's recipe that she has used for who knows how many decades. I myself have used it every year for 15 years. In this particular recipe, you do not use a boil water process method. You simply put them on a cookie sheet and put them in an oven for 20 minutes or so. However, you will not see this method used or recommended much at all. Some consider it unsafe, though I question wheter they have actually done it. I have read about it in many forums and it is considered dangerous and even unhealthy. If you read through the comments though, people who HAVE done it (most for over 50 yrs) will say "phooey". The Ball Canning Guide used to have it in their yearly cookbook. It makes sense to me that they may want you to ues the waterbath method as it encourages us to purchase water canners, special tools, gadgets and accessories. You don't need these for oven canning. So- use whatever method YOU prefer for the actual processing. I'm simply sharing how I do it. And for the record- I have NEVER had a jar break, not seal, or become tainted over the course of the year or two it may have sat upon my shelf. Never.

5. It's cooking, not baking, so feel free to add more onion, more sugar, less salt, less peppers whatever you like. The celery really needs to be in there for a crisp, fresh flavor, but you may want to grind it really fine (I do). Don't be anal about amounts. Go with the flow!

The Recipe:


Granny Jo's Tomato Sauce


25 peeled tomatoes (will follow up with directions on how to do this)
4-5 stalks celery finely chopped
3 onions chopped
3 cloves garlic chopped (I use minced from a jar sometimes)
1 green pepper chopped fine
Parsley (flakes or fresh)
1 cup sugar
2-4 TBSP salt

Chop tomatoes and place in pot. (I dont chop mine, I squeeze the juice out and discard it,then use a food processor and pretty much puree mine. Make it as chunky as you like.) Add the remaining ingredients and boil the hell out if it. I usually cook mine 1-2 hours. Let some of that water evaporate- it will give you a thicker sauce. That's why I squeeze the juice out of my 'maters as mentioned earlier. Then turn oven to 250. Fill HOT & CLEAN jars (I always have mine in the dishwasher ready to go) with sauce, cover with lids (that are soaking in hot water), then screw on bands and place on heavy duty cookie sheet. Bake for 20 minutes. OR process in cool packer 10 minuutes. Let sit on countertop for a few hours and listen for the "pings" of the lids!

Let me know how it goes!!

Wednesday, July 14, 2010

Cute Hat Giveaway

So you know how you go to a site, spend some time looking around and get sidetracked by another site, then veer off into another direction?? I have actually gotten online to look for the name of a song and ended up buying a baseball bat! Not to mention I lost 3 hours of my life just tooling around. Sigh. Such is life :)

Well today I can't even remember where I began, but I ended up finding this giveaway. And I have been seeing giveaways like crazy. They have several ways of entering: "Like" them of Facebook, leave a comment on their blog, Tweet about it etc... You can also post about it on your own blog which is what I am doing. Or attempting to do anyway- we shall see how this works out. I am not very skillfull with computer stuff so much of it escapes me.

So check it out if you have a minute- VERY cute stuff!

http://http://www.indiespotting.com/giveaways-sales/win-cotton-blossoms-hat-giveaway/comment-page-1/#comment-2024

Monday, June 28, 2010

More wedding....

Can you even believe this view?!


The whole gang tightened in for this fun shot...

The kiss......................


This is precious- the groom wrote his vows and I was able to get a close-up while he was reading them to her. And that's when the tears started to flow.......for me.


I really like this shot because of all the body language going on. Dad's a little tense, Officiant (her uncle by the way) seems to be challenging the groom "This is my niece buddy, you better understand exactly what you are expected to do here", the groom is taking it very seriously and the bride seems to be nervous for her sweetheart. Maybe it's just me, but I'm feelin' it. ♥